So then I got to thinking, "What about DDNS?" Dynamic DNS (or DynDNS, or DDNS) tracks your computer's current IP address and updates a service (such as DynDNS.org) every time your IP changes. This is useful if you know your computer has been stolen and you're wondering where it is.
It turns out I'm not the first person who's asked this question and configuring the service is unbelievably easy!
Here's the secure way to do it (grabbed from this website):
Step 1
First, you need to create an account with DynDNS to do so follow this howto: https://www.dyndns.com/services/dns/dyndns/howto.html.
Step 2
First we’ll install ssh and ssh-socket so we can send our DynDNS user and password encrypted instead clear text:
$ sudo apt-get install ssh libio-socket-ssl-perlStep 3
Install ddclient:
$ sudo apt-get install ddclientStep 4
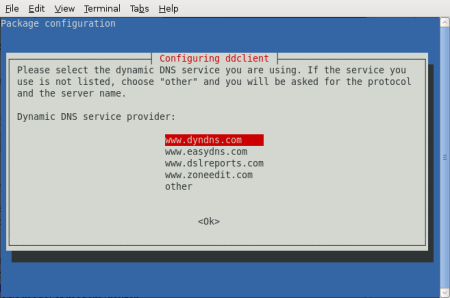
The installation will prompt you some questions. For the first one it ask for your dynamic DNS provider, select www.dyndns.com:
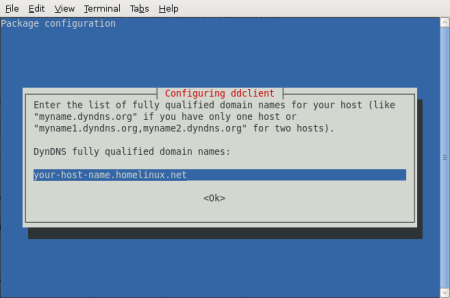
Then, put your fully qualified domain name(s):
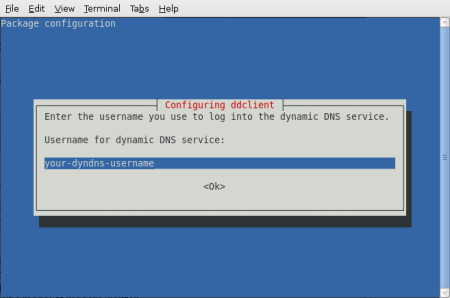
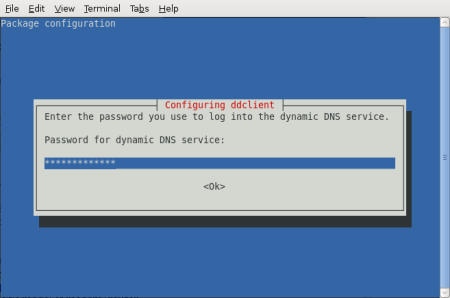
Now, your DynDNS requistered username and password:
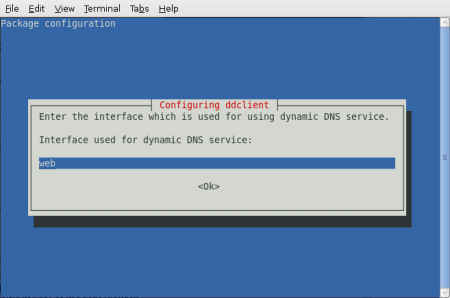
And finally, type “web” as the DynDNS interface to use:
Ok, so long we’ve finished installing ddclient but there’s still more work to do in order to get it working properly.
Step 5
We, need to change the ddclient configuration file (
/etc/ddclient.conf) in order to use ssh to send the username and password, and to properly check the IP adrress. From the command line open ddclient configuration:
$ sudo vim /etc/ddclient.confIn the generated configuration file you’ll probably see something like the following (The parts in italics will be different, the bold parts are going to change so special attention on this):
# Configuration file for ddclient generated by debconf
#
# /etc/ddclient.conf
pid=/var/run/ddclient.pid
protocol=dyndns2
use=if, if=web
server=members.dyndns.org
login=your-dyndns-username
password='your-dyndns-password'
your-host-name.homelinux.net
Step 6
We need to change the configuration so ddclient get our public IP address properly, and to send our username and password over ssh.DynDNS has a web interface to get your public IP address, this is equivalent to manually invoking http://checkip.dyndns.com/. But we need to properly configure this interface, so change the line
use=if, if=webfor the following:use=web, web=checkip.dyndns.com/, web-skip='IP Address'Second, add to your configuration file just below the initial comments the following:
ssl=yes
daemon=300
The above two lines tells ddclient to use ssl for its connection and to update your public IP address every 5 minutes (specified in secconds).
Step 7
Now, we must make sure that ddclient is set to run as a deamon. Edit
/etc/default/ddclient:$ sudo vim /etc/default/ddclientAnd make sure that:
# Configuration for ddclient scripts
# generated from debconf on Tue Jan 29 20:23:32 CST 2008
#
# /etc/default/ddclient
# Set to "true" if ddclient should be run every time a
# new ppp connection is established. This might be useful,
# if you are using dial-on-demand
run_ipup="false"
# Set to "true" if ddclient should run in daemon mode
run_daemon="true"
# Set the time interval between the updates of the dynamic DNS name in seconds.
# This option only takes effect if the ddclient runs in daemon mode.
daemon_interval="300"
Step 8
Finally, restart your ddclient and if no error is printed you’re good to go:
sudo /etc/init.d/ddclient restart
In addition to this, I recommend setting up a "Guest" account on your system that automatically logs in after 30 seconds at the login window. Give it Internet access but NO other access (restricted user account). This will give a thief a sense of being able to do something with the computer, even if they cannot.
If your laptop gets stolen, just jump into DynDNS.org and wait for the IP to change. When it does, run a traceroute and notify the police of any information you've collected.
Comments
Post a Comment